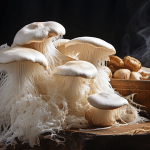
Buying a mushroom growing kit is definitely the easiest way to get started growing mushrooms at home. That is because edible mushroom growing kits are completely beginner-friendly, they do not require nearly any specialized skills, tools, or other equipment.
You likely have all of the supplies needed in your home, except for the mushroom kits themselves. These simple to use mushroom kits make it possible for novice growers to experience the fun of growing mushrooms without diving into the hobby too deeply.
Are Mushroom Kits Worth Buying?
If you can find high-quality kits, yes, then they are absolutely worth buying. There are loads of different brands of mushroom kits out there, and lots of different species of mushrooms that can be grown. So it is worth doing some research before you dive in. While I love growing mushrooms from scratch, I would love to give one of these kits a shot on its own, just to see just how efficient and simple it truly is. I was certainly skeptical at first, but ended up having a wonderful experience growing mushrooms with the kits, and I think they are absolutely worth trying for first-time growers.
What is a Mushroom Growing Kit?
A mushroom growing set is basically a pre-colonized “fruiting body” which has yet to be placed in conditions which will cause it to spawn actual mushrooms. The block with mycelium covering is usually contained inside the mushroom growing bag, where it can be left to dormant for a long time, particularly if kept cold in a refrigerator.
You can purchase growing kits for many different types of mushrooms, though some species produce better kits than others. One of the most common types of mushrooms that you will find in grow kits is Pleurotus ostreatus, your average “oyster mushroom”.
Oyster mushrooms are fairly resistant to infection, fruit incessantly, and can grow on all sorts of different substrates. They are super resilient, and they will produce mushrooms even when conditions are less than picture-perfect, making them an awesome option for the set-up.
Oysters also grow very fast, increasing your chances for success. Most growing kits only need a few simple steps and little upkeep, though chances of success and the potential harvest size increases significantly when a fungus unit is prepared and placed in the perfect conditions.
A Quick Oyster Mushroom Kit Review
The mushroom growing kit that I decided to give a go was Back to the Roots Mushroom Mini Farm. This “mini farm” is a growing kit for Oyster mushrooms, producing pearl oyster mushrooms, a delicious, fast-growing species that can stand a bit of abandonment and still deliver great results. A great choice for a home grower!
The set itself is pretty tiny, and the actual blocks of fruit are under 2 pounds. With that small of a substrate, I was not expecting to grow an enormous number of mushrooms, though the purpose of the kit is more about experiencing the mushroom growing process, rather than getting an enormous harvest.
Let’s Take a Look
Full disclosure: I bought this kit at a grocery store, then left it in my refrigerator for several months before actually using it. I thought that this may have had a detrimental effect on the kit, though, as you will see, the results were actually pretty nice nonetheless. Opening up the package, you will see the kit is one completely populated fruit unit inside of a little grow bag.
Back to the Roots says the substrate is recycled organic materials, though I cannot quite say exactly what that is. The unit passed an initial smell test (to determine whether or not it was contaminated) and seemed fine, smelling like a nice oyster mushroom should. There was quite a bit of orange metabolite in the packet, but that is not contaminated, and is generally not something you need to be concerned with.
Using the Kit
The instructions are fairly straightforward, and it seems that it is aimed largely at novice growers, those unfamiliar with the complicated terms involved with growing mushrooms. Basically, you shave, you soak, and you water. One small complaint I had is the fact that the set calls mycelium “soil”. While this is kind of a nice analogy, it is just not at all accurate. But considering that the majority of people buying these kits are not serious mushroom farmers, I completely get that!
As per instructions, I slit a little “X” on the front of the packet, scraping off a bit of mycelium. This “scraping” back of the front layer activates the mycelium, which is useful for initiating new growth and pining.
I soaked a block, face down, in a bowl of water for 12 hours. The block will float, so you might want to think about placing something heavy over the top of the block to help sink it. I chose to simply leave it floating, hoping that the block would absorb water.
This is a crucial step.
Mushroom fruit bodies are as much as 90% water, and almost all that water needs to be from the fruit blocks themselves. If your mushroom block does not have enough water, it will either fail to fruit, or quickly halt, along with any new mushrooms that form.
Fruiting the Kit
The third step in the instructions is Water, where we are instructed by the set to “spray 2-3 tsps water daily over the scratched areas until mushrooms are completely formed”. Again, these are great instructions for someone new to growing mushrooms, but in essence, the kit simply needs to be placed in a moist medium with indirect light. This is not unlike a typical growing environment used in growing mushrooms from seed. I chose to remove the bags from the packaging and put the set into the shotgun-style fruiting chamber. I am sure that the kit could grow on the countertop with no SGFC, which is what the kit is designed for.
Plus, pearl oysters are generally hardy fruiters. That is, unless you put your unit into a controlled environment such as an SGFC, there is a good chance that your unit will just dry up and simply fail to produce any fruit. Also, a shotgun-style fruiting chamber is simple to build and could be used in any mushroom project down the line.
When You Will See Results from Mushroom Grow Kit?
It took around 15 days for the first pin to appear. That is longer than expected.
It could have been due to letting blocks sit in the freezer so long before using. Other than that, I am not sure why. The SGFC is kept constantly moist, light is indirect, temperature is 16-19 degrees Celsius. I did not directly “spray” the blocks like was recommended, and perhaps this delayed the fruits, though directly misting prior to planting is not a technique I usually employ.
Once pins arrived, growth was fairly rapid: mushrooms were ready to harvest just seven days after pins were first placed.
Again, this quick growth is fairly typical of oyster mushrooms in general, and pearl oysters specifically.
How to Harvest Mushrooms from Grow Kit
During this period, the SGFC was sprayed twice daily with water and a fan, allowing fruit to develop rapidly. For me, that is the best part of growing mushrooms.
Every morning, you get to wake up and walk over and check on your mushrooms. Often, they have doubled in size over the course of the night. It surprises and delights me each and every time. While the mushrooms did a good job of pins and fruits, only three major fruiting bodies appeared, and the set failed to make the clusters that I was hoping for. You never can truly predict the shape that the fruiting bodies will take on your mushrooms, which is part of the fun, but you are always hoping for an enormous bloom.
Regardless, the mushrooms that actually do grow are nice looking clusters. The stalks were a bit thicker and longer, and the caps were a bit smaller than I had expected.
Typically, with oysters, that is a sign of not getting enough air. While I opened the SGFC lid about twice per day to ventilate, this would likely help to do so more frequently. It is truly impossible to understate just how much oxygen oysters require in order to develop big, capped clusters.
Time to Harvest
Once the oysters had grown to a decent size, I decided to pick them. The box says that they are ready for harvesting when they no longer double in size each day, but in my opinion, this is really not a great metric. With oyster mushrooms, the best time to harvest is typically just before the caps begin curling. This indicates they are ready to release spores, and as soon as this happens, they are past their best.
I may have picked my oysters slightly too early, but I am excited to taste them! Plus, oysters can go from being picked way too early to being past their prime in a hurry, so you are better off being a bit early than WAY too late. You can pick mushrooms by cutting them from a clump, near the base of the stalk, with a sharp knife. Try to take off as much as you can, especially if you are going to do a second flush. Old, dying stems left over from the fruiting unit are a common place where contaminates can gain a foothold.
I ended up getting just 79 grams (just under 3 oz) of fresh oyster mushrooms in my first run. Even then, a fair portion of that weight was the tough stalks, which are pretty chewy and generally edible. While this seems like low-hanging fruit, and in some ways, it is, I was still pretty pleased.
The whole point of these kits is to simply experiment with growing your own mushrooms at home as simply as possible, and the kits were an absolute blast to use in this regard.
Can You Re-use Mushroom Grow Kit?
Once the mushrooms are harvested, do not discard the blocks! You can always try for a second, and maybe a third, flush. Some folks report getting over 5 flushes out of one kit!
All you need to do is soak the unit again to rehydrate, and then put it back into a grow environment. It takes some time before mushrooms are pinched back up, and you may need to wait as long as two weeks. It is always possible it may also get contaminated, so be on the lookout for any green mould. If it shows up, look to trim it. If it gets too moldy, it is time to toss it.
Updated 10/3/2022
Learn more:
