So, you would like to know how to grow oyster mushrooms. Oyster mushrooms are one of the easiest mushrooms to grow, and they are tasty to eat, as well as very healthy for you. Heres how to grow them at home.
Steps on How To Grow Oyster Mushrooms At Home
Step 1: Prepare the Supplies You’ll Need
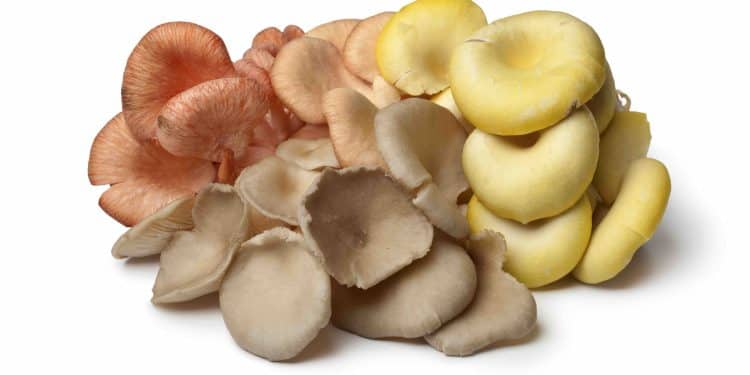
First, you need to decide which oyster mushrooms you would like to grow. There are several different types of oyster mushrooms from which you can select your mushrooms. Here are a few of the most popular ones.
Sometimes called common oyster mushrooms, winter oyster mushrooms, or gray oyster mushrooms. Pearl oyster mushrooms are among the most widely available varieties and still offer great health benefits.
They thrive well in cool temperatures. Commonly found all over the Northern Hemisphere, blue oyster mushrooms are a subspecies of common oyster mushrooms. It is one of the fastest colonizers of all the oyster mushroom varieties, preferring to grow at a cool temperature between 45-65°F (12-18°C). Also sometimes known as the Summer Oyster Mushroom, Italian Oyster Mushroom, or Indian Oyster Mushroom, Phoenix Oyster Mushroom has evolved to grow in warmer climates.
Depending on strain, it is white or tan/brown. Sometimes also called the Yellow Oyster Mushroom, this species is most known for its striking colors, as well as the fact that it looks like a popular chanterelle mushroom.
They prefer a warmer temperature between 64-86°F (18C-30°C).
One of the more distinctive varieties of oyster mushrooms, pink oyster mushrooms grow fast, producing fruits in just 3-4 weeks.
They prefer a warm temperature between 64-86°F (18C-30°C). Also known as Eryngii Mushroom, this one has a solid texture with delicious, meaty flavors. It is harder to grow than the other oyster mushrooms. So, this is not a great variety to get started. It likes cool temperatures in 45-65°F (12C-18°C).
What Substrate is Best for Oyster Mushrooms
Substrates are a food source that allows mushroom mycelium to grow. Mycelium is a root-like vegetative growth of the mushroom, and is as crucial for the growth of oyster mushrooms as the apple tree is for apples.
The most commonly used substrate for oyster mushrooms is straw. However, wood chips, cardboard, coffee grounds, and other agricultural byproducts, such as sugarcane bagasse, coco coir, and cotton pulp, may also be used.
How do you decide what kind of substrate you will use? Choose whatever is easiest to get your hands on! The easiest substrate to get started with is likely wood pellets or sawdust, since they are already pasteurized and all you have to do is add water to hydrate it. Straw is also a very forgiving substrate to grow on. Either way, pick the substrate material you can easily obtain, and use the instructions below to prepare it for inoculation.
Before starting the grow, preparing the supplies is the final step to getting started.
If you are in the US, you can purchase Oyster Mushroom Spawn from North Spore. Outside of the UK, best is just do a search “oyster mushroom spawn + [your country]”. Most countries have plenty of suppliers similar to North Spore.
You can also usually buy such Spawns from Amazon or Ebay. Grain spawns will yield more yields than Sawdust spawns, so try and get some of these if you can.
As far as growing containers go, you would better be able to source specially made bags to grow mushrooms. They allow the ideal air circulation, while keeping the competing moulds and bacteria at bay. If you cannot get hold of these growing bags, you can also grow mushrooms in a bucket, as in the picture, or with a large freezer or Ziploc bag, poking holes every 10cm all the way around the bag, 5mm deep.
Step 2: Prepare Your Substrate to grow Oyster Mushrooms
The purpose of a substrate is to provide a source of water-based nutrients, that is also free from other microorganisms which normally compete with fungus mycelium. Straw, cardboard, woodchips, and coffee grounds are all simple substrates used to grow oyster mushrooms which accomplish this. Heres a brief rundown on how to prepare each.
Straw is the most common substrate used in growing oyster mushrooms. It is generally inexpensive, provides important nutrients, and oyster mushrooms thrive on it.
Pasteurize it by steeping in warm (65-80°C/149-176°F) water for 1 to 2 hours, or soaking it in a cold, high-pH lime brine bath for 12 to 18 hours. The beauty of using these is that they are already pasteurized from the heat and pressures of pellet manufacturing processes. Add equal weight of water to the weight of pellets, soak for 30 minutes. And then stir to break up pellets to make moistened wood chips.
Coffee grounds from the scrap heap are an abundant resource (and they are pasteurized). Despite much disinformation online, coffee grounds actually make for a fairly decent substrate to grow oyster mushrooms. The key is to use fresh grounds (within 24 hours of being brewed) that have been pasteurized and watered down from the coffee-brewing process.
Beyond 24 hours, competing moulds begin to grow which will overtake your fungus. Ideal as a stand alone substrate in smaller amounts (1kg or less), but mix 20-50% of straw in if going large.
Step 3: Inoculation of the Substrate
Inoculation is the process of adding the mushroom spawn into the substrate you have prepared. Before starting the mixture, wash your hands thoroughly with soap, and clean any surfaces that you are going to be working with a cleaning spray. Make sure that the humidity of your base is correct. The pasteurization process likely moistens your substrate to an appropriate level, but it is important to make sure that your substrate is neither too dry nor too wet. Depending on your materials, aim for anywhere from 55% moisture content (sawdust and coffee grounds) to 74% moisture content (straw).
The easiest way to check is the Squeeze Test.
Squeeze your support lightly in your hands. It should form a ball in your hand, with a few drops of water coming out. If it does more than that, you need to let the substrate dry a little. If it does not stick together in your hands, then it is probably too dry, and you will have to add some more water. Next, stir your substrate and fungus starter into a container of some kind (a big plastic box, barrel, anything thatas handy), then dump your substrate into the growing container, closing the top with a rubber band, paperclip, sticky tape, or tying of some kind.
If not using filtering sacks, make several small holes around the sacks about 10cm apart to allow for air circulation.
Step 4: Incubation Period for Oyster Mushrooms
Incubation is where the magic begins! This is where your introduced starters grow and disperse over your growing medium, readying them for the last stage of fruiting.
Providing the conditions needed to grow incubation is easy, even at home. You can use any warm (20-24°C) area of your house, such as your pantry or the boiler room. The area should be ideally dark so that you do not get pinched beforehand, but this is not necessary.
The larvae will spawn in warm, wet conditions inside a pouch, eating their way through whatever food you give them. Once the bags are fully white, it is time to begin harvesting.
Step 5: Fruiting Oyster Mushrooms
Now, the moment you really waited for. After all of your hard work, it is time to reap the rewards and pick up a few tasty oyster mushrooms.
Mushrooms grow in the wild as a response to stress, such as running out of food, or changes in the environment. You want to reproduce that process in your house or backyard. Once a sack is completely populated (i.e.
While direct sunlight is not a great idea, you do need a little indirect or shady light to get your fruiting bodies to properly form. They do not get their energy from light, so a light that is angled, or on the windowsill with a shade would suffice.
In the wild, Oyster mushrooms are used to growing out of stumps or logs in the presence of cool, oxygen-rich air. Providing a slit, or 5cm hole, into the package will communicate to the mycelium that there is room for it to grow from.
Spray twice daily with water to keep your substrate moist and humid in which to develop your mushrooms. This will encourage the mushrooms to develop, and prevent them from drying out while developing.
This is different for every strain, but in general (except for King Oyster) most Oyster mushroom varieties are not overly fussy with the temperatures at which they grow. They will form best within their ideal range, which is mentioned in the strain information above, but they should still produce if you are within 10-30°C (50-86°F).
Within 7 days, you should begin to see small mushroom needles form from the pit. Over the next 5-7 days, you will witness a wonder of nature, as these tiny mushrooms will double in size each day (keep spritzing them twice daily to keep them moist while growing).


