Background on Reishi Mushrooms
Reishi mushrooms (Ganoderma lucidum) are shelf-dwelling, saprotrophic mushrooms that feed on the dead or dying hardwood stumps and trees.There are about 80 different species of reishi around the world, and they go by several different names. In the West, reishi is the most popular name, but there are several others. In the East, where humans have used these mushrooms for over 2000 years, there are several names as well. The most common is Lingzhi, or immortal mushrooms. Let’s learn more about growing reishi mushrooms.
Why Should You Grow Reishi Mushrooms?
If you are in a place that does not allow foraging for reishi mushrooms, but want to reap all of the awesome health benefits that they provide. Growing your own is a great option.
There are a few reasons you should grow your own reishi, including, You do not need expensive equipment, and you do not need ideal growing room conditions. You can grow reishi either indoors or out. You can grow reishi in cans, buckets, or bags, as well as on wooden planks.
They are resistant to infections and contaminants. They can withstand high as well as low levels of CO2. They are fascinating to watch mature and grow.
You can raise them in two different forms, conk shape or antler shape. They are a pretty cool mushroom to grow. They are loaded with a lot of health benefits.
Difficulty To Grow: Easy to Medium
Agar: The reishi looks really unique in agar. Glowing white, rhizomorphic threads radiate out of the middle of the dish. The mycelium is impossibly hard, even hard to slice with a scalpel.
Types of Propagation: Reishi grows very well on Rye grains and others.
It is recommended against using sawdust as a substrate as reishi can make the sawdust too compact, making it hard to use it as a starter. Reishi spawn is hard to crack into small pieces in cans, be sure to keep your grains from combining too much prior to casting. You might need to use a spoon to break it apart.
Soil Type: Supplemented with hardwood wood chips. Reishi would not grow very well in straw.
It is also possible to inoculate hardwood stems with reishi spores to grow outdoors.
Fruit containers: For indoor growing, use large, autoclavable grow bags. Allow the fruiting body to develop within the bags at the top of a block. Once antlers reach desired size, cut the top off of the bag and move the block into a “fruiting” state, increasing fresh air will result in the Reishi beginning to produce the spores that create “conks”.
Yield: Reishi mushrooms typically will produce just one flush. For greater yields, let mushrooms produce a fungus that has conks rather than antlers. This is done by allowing plenty of cool air to circulate through the growing environment.
Harvest: Harvest reishi mushrooms right before fruiting bodies drop their spores. Reishi mushrooms carry heavy spore loads that can fill your grow room with brownish-brown spores in a hurry.
Use a sharp knife or serated knife to slice mushrooms from blocks. You might need to cut the mushrooms through, because they are so tough, and typically, blocks are discarded after their first ripeness.
Dried sliced Reishi mushrooms in the dehydrator to store long-term.
Weaknesses: Reishi mushrooms are resistant to contaminating, but spawn is extremely tough, making a harvest difficult. This may make it hard to spread evenly through a growing bag. Reishi sometimes starts to produce fruit bodies before colonization of a lock is complete.
Cooking: Reishi mushrooms do not have any culinary uses, since they are extremely woody and bitter. Only a brave soul would attempt cooking with Reishi, but a better choice would be to use it as a dried powder sprinkled on dishes. They are best known for their medicinal properties.
Boil fresh reishi mushrooms in water for 20-30 minutes to extract the medicinal compounds and brew the tea. Dried Reishi should be cooked longer, for 1 -2 hours.
The tea is overwhelmingly bitter. It can be stored in a refrigerator for several days after tea is made.
Can You Grow Reishi Mushrooms at Home?
Yes, you can grow reishi mushrooms at home, they are one of the easiest medicine mushrooms to grow. While it is not quite as simple as growing oyster mushrooms, growing reishi mushrooms is not difficult. And, you do not need much prior experience to get started. If you are completely new, you might wonder, How can I grow reishi? The easiest way to grow reishi is with a reishi growing kit.
You can purchase these online or at your local vendor. The growing kits come with a block of inoculated, colonized soil, which means that once you receive the growing set, you are ready to begin your process of growing your own fruiting body. Soon enough, you will be the proud owner of your own, homemade reishi mushrooms.
Here is a quick introductory video from our friends at FreshCap on the process of growing reishi mushrooms that’s quick and easy:
How Long Does it Take to Grow Reishi Mushrooms?
How and where you grow your reishi mushrooms will determine the amount of time it takes for them to grow. Growing reishi mushrooms on a tree stump takes longer than growing them in bags or containers. Try growing reishi using a sawdust supplemented log, either indoors or out.
You can harvest fresh reishi about eight weeks after you have inoculated your growing medium. Fruiting is the longest phase, and reishi mushrooms can take as long as six weeks from when pins first appear for them to be fully mature.
Colonization, however, is relatively fast. It typically takes mycelium seven to 14 days to completely colonize a sawdust block. However, colonization takes much longer if you decide to grow your reishi on logging blocks. When using woodchip sprouts to inoculate the logs, it takes anywhere from nine to 12 months for your reishi to start producing fruit.
And, if inoculating logs using pore spawn, it may take 15 to 18 months before you see signs of reishi mushrooms. Also, the larger your log diameter, the longer the colonization takes. Temperature and growing conditions also play a part in the time taken for your reishi to grow. Colder temperatures can make this process slower.
Steps to Learn How to Grow Reishi Mushrooms Indoors
There are several ways that you can approach growing reishi mushrooms at home. When deciding on the best way for you, take into account your experience level and how much you want to grow. As mentioned earlier, the growing kit is a great way for total beginners to quickly and successfully grow reishi mushrooms. Or, if you would like to learn the process more, you can order the reishi spores by grain, and prep and inoculate your own substrate. An even bigger challenge is starting from scratch and growing reishi grain spawn on your own.
But, once you get a little bit of experience, it is best to give it a shot. Reishi mushrooms can withstand high or low CO2 levels, and you can grow them in many containers, including bags, buckets, cans, and other recycled containers. The following step-by-step guide is intended for novice mushroom growers looking to create their own growing blocks, using Reishi starter cultures purchased from reputable vendors, along with bags for growing mushrooms.
Step 1: Gather Supplies You’ll Need
Reishi Spawn: When growing reishi in your home, you may want to use either wheat slurry or sawdust starter. We recommend using wheat spawn because it is easier to chop up and mix into your substrate. Reishi spawn holds sawdust tightly together, making the grain spawn more difficult to break up and evenly distribute throughout the substrate.
Hardwood Pellets: These are a simple substitute for sawdust or wooden chips. And they are easy to come by because people use them in their pellet stoves and barbecues. They are also relatively cheap and easy to stock. But be sure to buy hardwood pellets, because reishi does not grow in softwoods.
Oats or Wheat Bran: Bran is a nitrogen-rich additive added to your substrates that provides additional nutrients to your mycelium. You can find small bags of bran in your local grocery store. But, if you are planning on growing lots of mushrooms, the least expensive option is to purchase larger quantities at animal feed stores.
Large Grow Bags: These bags are ideal for growing mushrooms in your home. They have filtered patches which allows mycelium to breathe as it colonizes a substrate. And they can handle temperatures needed for sterilizing the substrate.
You can even use these bags as miniature grow rooms. They provide a place to form the antlers of the Reishi plant at the top of the substrate, inside a sealed grow bag.
Step 2: Prepare The Substrate
Once you have got all of the materials, you are ready to start. First, you will want to get your reishi growing medium, or substrate.
A big growing bag usually makes one 5-pound (2.3-kg) block of fruit.
Ingredients
- Five cups of hardwood pellets
- One and a quarter cups of bran
- Six cups of water
Process
- Combine pellets and water in a bucket or bowl, then soak for 30 minutes. The hardwood pellets will crumble into a sand-like substance. Warm water will accelerate this process, but it is not required.
- Add bran to sawdust and stir well to distribute it evenly.
- Perform the squeezing test to ensure the proper moisture content of the substrate. When you slightly squeeze the substrate, it should hold together in your hands, with just a few drops of water coming out.
- Place your mixture in the grow bag, pushing as much air out of the bag as you can, and folding the bag according to instructions.
- Now put the bag into a pressure cooker and cook for two-and-a-half hours on high 15psi. Remove the bag from the pressure cooker and let the substrate cool. Once it is fully cooled, which may take up to eight hours, proceed with step three, the inoculation.
Step 3: Inoculation of the Substrate
Inoculation is the process of mixing the grain-like Reishi into the hardwood base that has been prepped. Before beginning, wipe all surfaces of your workspace, and wash your hands thoroughly with soap so that the substrate is not contaminated. Next, you will want to add the Reishi Grain Spawns, which have a 5 percent growth rate, to a moistened substrate and stir it all together.
You can do this inside a bag, but often times, it is easier to mix outside of a bag into a larger box or container. Once your soil and starter are thoroughly mixed, dump your reseeded soil into your grow bag. Seal the top of the bag using rubber bands, sticky tape, or a tying method of some sort.
Step 4: Incubation Before Growing
Place a covered growing bag in a warm, dark place at room temperature and let incubate. The reishi larvae will grow and propagate through the bag until they have fully colonized the growing medium. Reishi is a powerful colonizer, typically taking between 10 to 14 days to colonize a bag of substrate. But at an ideal temperature and with 80% humidity, the reishi can colonize the bag within one week. Cold temperatures would slow the colonization process.
Step 5: Fruiting Begins
Once the colonization is complete, you will want to give the reishi the proper temperature and humidity, called fruiting conditions, to make them fruit and grow mushrooms. Reishi thrives best at room temperature of about 75-85F (24-29C), but they will tolerate a wider range of temperatures, with a cool temperature around 65F (18C) helping initiate the pips. Like other mushrooms, reishi require a lot of humidity in order to grow well. They thrive at moisture levels between 85 and 90 percent.
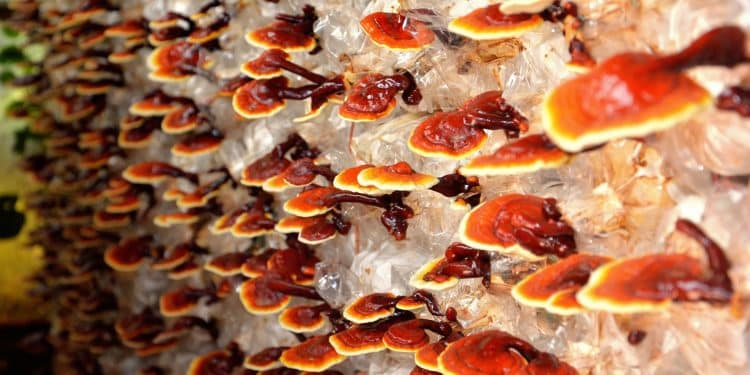
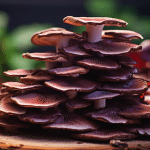
When the Reishi mushrooms first emerge, they make projections similar to fingers called antlers, which are similar to candy corn in color. At this point, growing reishi mushrooms gets interesting. You can grow these mushrooms as antlers or as conks, depending on your preferences.
Step 6: When to Harvest Reishi Mushroom
Reishi mushrooms grow much slower than many other types of mushrooms. While some mushrooms, such as oyster mushrooms, can double in size every day and be ready to harvest within a week, reishi mushrooms take much longer.
If you are growing acorn-shaped reishi, you get to pick and choose when you want to harvest. Harvest them when the antlers are just a couple of inches high, or let them grow for months and enjoy the unique shapes they will develop.
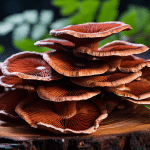
Growing reishi conks will yield a higher harvest. You can harvest the reishi conks in any phase as well. But, for best harvesting results, aim to harvest them right before they drop spores. When growing, reishi mushrooms have bright, white, aerated edges.
When that edge starts getting smaller, that is a sign that they are nearly done growing, and it is a great time to pick them. At this point in their maturation, they should have fan-shaped leaves that have reddish colors and look like they are coated in a wet tarp.
Reishi mushrooms carry heavy spore loads, so you will want to pick them up before they blanket the surrounding area in a brown powder. Use a sharp knife blade or serrated blade to slice mature Reishi mushrooms from their fruiting blocks. Be careful to avoid damaging any mushrooms that are still growing.
How to Grow Reishi Mushrooms on Sawdust Substrate
This way to grow reishi outside is easier, way faster than the traditional log culture, and it is a lot of fun. It involves taking a completely inhabited sawdust fruiting unit and planting it into soil for harvesting.
Step 1: Make Reishi Mushroom Fruiting Block
To create the colonized fruiting mushrooms unit, follow steps one through four of the above detailed guide on growing reishi indoors. When completely colonized, small fruiting bodies called antlers will begin growing within the block. Now is when you should bring the block of reishi outside and “plant” it.
Step 2: Plant The Reishi Fruiting Block
You can grow fruiting blocks directly into the soil, or into raised beds or planting boxes. Reishi requires indirect light, heat, and humidity for growth. If your reishi antlers are drying, it will not grow. If you do not have a hot, shaded, protected spot in your garden, you are going to have to cover your reishi with something and set up a miniature greenhouse so that the sun and wind cannot dry them out.
Once you’ve chosen your spot, pull the reishi blocks out of their bags, dig a hole, and plant the blocks into soil, covering the tops with a thin layer of soil. The soil helps to hold the moisture, but is not necessary for growing reishi, since all of the nutrients that the reishi needs are already contained within the hardwood wood shavings block. But, mycelia can take a few nutrients from the soil too. Once you have “planted” the reishi blocks, saturate the soil thoroughly with the hose to ensure that it has adequate water.
Step 3: Fruiting Time
The needles that begin to grow in your lock when you are holding a bag can be killed. But, after a week or so of planting your reishi blocks, you should start seeing new pins begin growing.
Moisture levels are crucial in growing mushrooms, particularly during the initial stages, when the pins are developing. We recommend misting reishi with a spray bottle every day during this phase to make sure it stays moist. Your reishi will continue to grow and flatten out to ripe, shiny red fruiting bodies, and may be ready to harvest in about six weeks.
Step 4: Harvesting
You can harvest your reishi at any point in its growth, but the best time is when the mature reishi is harvesting, right before they drop the spores. Try to stand as close as you can to the blocks, then cut reishi from their fruiting blocks with a sharp knife blade or serrated blade.
How to Grow Reishi Mushrooms on Logs
Step 1: Get The Supplies You’ll Need
The first step to growing reishi on logs is gathering materials and the necessary equipment, including finding the right logs, and ordering reishi spawn.
Find and Cut Logs
You can grow reishi mushrooms in the trunks of most broad-leaved hardwood trees, but some yield better yields than others. Oak, sugar maple, beech, and plumb are good choices that will provide higher yields. Cut hardwood trees that are healthy with their bark intact, preferably when dormant. Dormant trees are brimming with sap, with a higher concentration of nutrients and sugars. Reishi mushrooms can grow on various log sizes, including tree stumps, using either a drilling-and-filling method, or the tree-totem method.
A popular way of growing reishi in the Orient uses shorter logs, between 12 to 20 inches (30 and 50 cm) long, 4 to 6 inches (10 and 15 cm) in diameter. These are then buried upright in a well-draining soil or in a planter. Longer logs, about 3.5 feet (1 metre) long, are usually buried horizontally in soil. If you are planning on using the hole-and-fill method, logs 4 inches (10 cm) in diameter and 36 to 40 inches (91 to 102 cm) in length are ideal. But, for standard, people use logs that are 3 to 6 inches (8 to 15 cm) in diameter.
When to Cut Your Logs
There are two perfect times for cutting a tree. During those times, sugary sap is at its highest concentration and bark is tightest.
The earliest is during fall, after one-third of the trees leaves have changed color. And the second is in the late winter and early spring, before the tree begins budging.
Ideally, try cutting the trunks about 15 to 20 days before you intend to re-inoculate them. Once you have cut your logs, they should be rested at least two weeks prior to inoculation.
This is so that the trees protective systems can shut down. During this time, keep them near the ground, in a shaded, protected location, so they do not dry out. But do not lay on the ground, because lying on the ground or leaf litter can lead to contamination. You may leave the stumps resting for over two weeks, but do not wait longer than one month from colleting the logs to inoculate.
Purchase Reishi Spawn
People typically use the plug spawns for smaller projects up to about ten Logs, which is ideal for new reishi log Growers. You can purchase reishi plug spawn online from a few vendors, with bags of 100, 500, or 1,000 plugs. You will have to figure out how much you will need before buying the plugs. A log that is 36 to 40 inches long (91 to 102 cm) typically requires around 30 to 50 plugs to cover it completely.
- drill
- hammer
- Sealing wax
- A small paintbrush or baster
Step 2: Inoculation of Logs
The first step when sprinkling a plug-spawned log is drilling holes. Start by drilling rows of 1-inch (3-centimeter)-deep holes spaced 4 to 6 inches (10 to 15 centimeters) apart along the length of the log. Rotate your log, and start the next row from 2 to 2.5 inches (5 to 6 cm) from the first, spacing out the holes so that you are creating a diamond-shaped pattern. When you have holes around the entire log, push the plug spawn dowel through each hole. Tap the dowels lightly with your hammer until they are flush with the wood and just under the bark.
Now, you will want to seal up the holes in the plugs with wax, so that mycelium does not dry out, and so that other fungi cannot enter the logs. You can use cheese wax, candle wax, or beeswax for this. First, melt the wax in a double boiler or an old baking pan, and then use a small paintbrush or a wax dauber to paint your holes.
Step 3: Incubation
Once you have the infection, put the stumps into shaded, protected areas that receive a lot of natural rain. During the incubation period, maintaining your logs humidity levels is crucial. If they completely dry out, your mycelium will die. Your logs will require about 1 inch (25mm) of rainfall per week. In drier weather, water your logs once or twice per week to keep them at an adequate humidity.
Logs that are inoculated early in the spring may have mushrooms in place by the fall. But, typically, reishi needs 12 months or longer to completely colonize a log, depending on log size and weather conditions.
Step 4: Fruiting from the Logs
Reishi mushrooms thrive best in warm, moist conditions, typically starting to appear during summer one year after being injected. Reishi tends to produce higher yields if you place the completely inoculated logs into well-drained, sandy soil and cover with 2 inches (5 cm) of topsoil. Burying logs helps to keep the humidity levels up, and can provide additional nutrients to the mycelium. Mushrooms will produce fruits from the logs, while acerbic reishi will poke out of the topsoil and into the fresh air, beginning to flatten out to a cone. It is important to maintain a high humidity level while they are fruiting, and if you live in a windy, dry location, then a greenhouse is probably best for fruiting reishi.
Step 5: Harvesting from the logs
You can harvest your reishi at any stage, but you will have the most prolific harvests if you are patient and wait until they are fully grown. To harvest reishi, cut them off at the base of the stalk, where it is attached to a log, using a sharp knife, pair of gardening scissors, or pruning shears.
Other Reishi Growing FAQ’s
Where Does Reishi Grow In Nature?
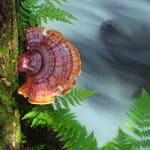
If you’re wondering where does reishi mushroom grow in nature, reishi mushroom typically grows on base of live and dead hardwoods, or around stumps in forests of China and Europe, although a few introduced or escapee populations are found in the United States in Utah and California. Reishi is a hard, often squarish, a zonal clavate mushroom; with a rusty-brown, glossy upper part It’s cap is a shelflike, half-circle; deep reddish-brown, lighter at the edges; texture is tough, glossy, often zonal.
You can find our favorite capsules, powders, and tincture’s on the following pages of our website and learn more about each individually:
Best Reishi Mushroom Supplement
Best Reishi Mushroom Mushroom Gummies
Additional Resources:
Can you freeze reishi mushrooms?
What Kind of Trees Do Reishi Mushrooms Grow On?
Updated 10/18/2022
